Keep Talking and Nobody Explodes v. 9
Introduction
Welcome to the dangerous and challenging world of bomb defusing.
Study this manual carefully; you are the expert. In these pages you will find everything you need to know to defuse even the most insidious of bombs.
And remember — One small oversight and it could all be over!
Keep Talking and Nobody Explodes v. 9
Defusing Bombs
Defusing Bombs
A bomb will explode when its countdown timer reaches 0:00 or when too many strikes have been recorded. The only way to defuse a bomb is to disarm all of its modules before its countdown timer expires.
Example Bomb
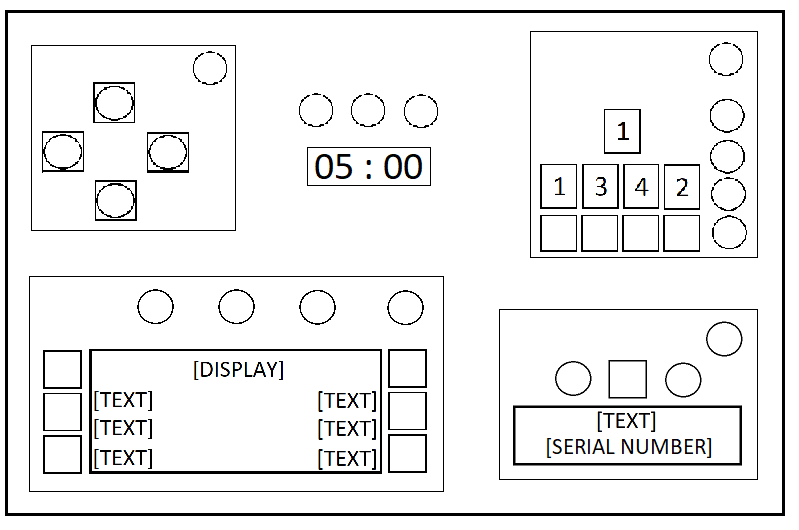 Front |
Modules
The bomb will include 4 modules that must be disarmed. Each module is discrete and can be disarmed in any order.
Gathering Information
Some disarming instructions will require specific information about the bomb, such as the serial number.
Strikes
When the Defuser makes a mistake the bomb will record a strike which will be displayed on the indicator above the countdown timer. Bombs will explode upon the third strike.
Strike Indicator

Keep Talking and Nobody Explodes v. 9
Modules

Modules
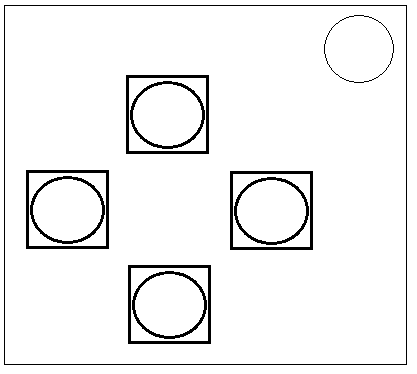
Modules can be identified by an LED in the top right corner. When this LED is lit green the module has been disarmed.
All modules must be disarmed to defuse the bomb.
Keep Talking and Nobody Explodes v. 9
The Button

On the Subject of The Button
You might think that a button telling you to press it is pretty straightforward. That’s the kind of thinking that gets people exploded.
Follow these rules in the order they are listed. Perform the first action that applies:
- If the left LED is blue and the LCD says "Abort", press and immediately release the button.
- If the left LED is red and the LCD says "Hold", press and immediately release the button.
- If the left LED is green and the LCD says "Detonate", press and immediately release the button.
- If none of the above apply, hold the button and refer to "Releasing a Held Button".
Releasing a Held Button
Based on the color of the LED on the right, you must release the button at a specific point in time:
- Blue LED: release when the countdown timer has a 4 in any position.
- Red LED: release when the countdown timer has a 3 in any position.
- Green LED: release when the countdown timer has a 5 in any position.
- White LED: release when the countdown timer has a 1 in any position.
Keep Talking and Nobody Explodes v. 9
Simon Says
On the Subject of Simon Says
This is like one of those toys you played with as a kid where you have to match the pattern that appears, except this one is a knockoff that was probably purchased at a dollar store.
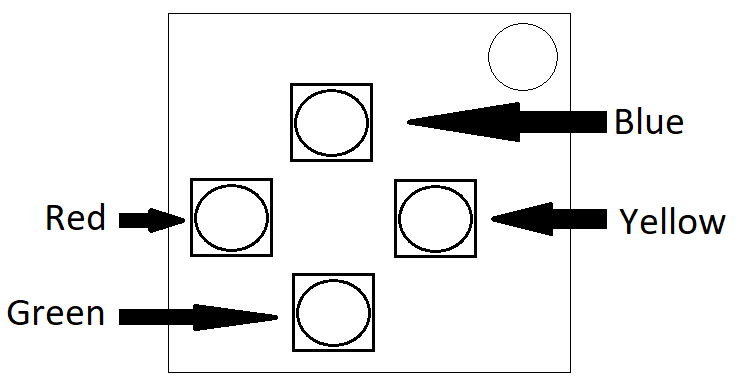
- One of the four colored buttons will flash.
- Using the correct table below, press the button with the corresponding color.
- The original button will flash, followed by another. Repeat this sequence in order using the color mapping.
- The sequence will lengthen by one each time you correctly enter a sequence until the module is disarmed.
If the serial number contains a vowel:
| Red Flash | Blue Flash | Green Flash | Yellow Flash | ||
|---|---|---|---|---|---|
| Button to press: | No Strikes | Blue | Red | Yellow | Green | 1 Strike | Yellow | Green | Blue | Red | 2 Strikes | Green | Red | Yellow | Blue |
If the serial number does not contain a vowel:
| Red Flash | Blue Flash | Green Flash | Yellow Flash | ||
|---|---|---|---|---|---|
| Button to press: | No Strikes | Blue | Yellow | Green | Red | 1 Strike | Red | Blue | Yellow | Green | 2 Strikes | Yellow | Green | Blue | Red |
Keep Talking and Nobody Explodes v. 9
Who's on First
On the Subject of Who’s on First
This contraption is like something out of a sketch comedy routine, which might be funny if it wasn't connected to a bomb. I’ll keep this brief, as words only complicate matters.
- Read the display and use step 1 to determine which button label to read.
- Using this button label, use step 2 determine which button to push.
- Repeat until the module has been disarmed.
Step 1:
Based on the display, read the label of a particular button and proceed to step 2:
|
|
|
|
|
| ||||||||||||||||||||||||||||||||||||||||||||||||
|
|
|
|
| |||||||||||||||||||||||||||||||||||||||||||||||||
|
|
|
|
|
| ||||||||||||||||||||||||||||||||||||||||||||||||
|
|
|
|
|
| ||||||||||||||||||||||||||||||||||||||||||||||||
|
|
|
| ||||||||||||||||||||||||||||||||||||||||||||||||||
Keep Talking and Nobody Explodes v. 9
Who's on First
Step 2:
Using the label from step 1, push the first button that appears in its corresponding list:
| "READY": | YES, OKAY, WHAT, MIDDLE, LEFT, PRESS, RIGHT, BLANK, READY, NO, FIRST, UHHH, NOTHING, WAIT |
|---|---|
| "FIRST": | LEFT, OKAY, YES, MIDDLE, NO, RIGHT, NOTHING, UHHH, WAIT, READY, BLANK, WHAT, PRESS, FIRST |
| "NO": | BLANK, UHHH, WAIT, FIRST, WHAT, READY, RIGHT, YES, NOTHING, LEFT, PRESS, OKAY, NO, MIDDLE |
| "BLANK": | WAIT, RIGHT, OKAY, MIDDLE, BLANK, PRESS, READY, NOTHING, NO, WHAT, LEFT, UHHH, YES, FIRST |
| "NOTHING": | UHHH, RIGHT, OKAY, MIDDLE, YES, BLANK, NO, PRESS, LEFT, WHAT, WAIT, FIRST, NOTHING, READY |
| "YES": | OKAY, RIGHT, UHHH, MIDDLE, FIRST, WHAT, PRESS, READY, NOTHING, YES, LEFT, BLANK, NO, WAIT |
| "WHAT": | UHHH, WHAT, LEFT, NOTHING, READY, BLANK, MIDDLE, NO, OKAY, FIRST, WAIT, YES, PRESS, RIGHT |
| "UHHH": | READY, NOTHING, LEFT, WHAT, OKAY, YES, RIGHT, NO, PRESS, BLANK, UHHH, MIDDLE, WAIT, FIRST |
| "LEFT": | RIGHT, LEFT, FIRST, NO, MIDDLE, YES, BLANK, WHAT, UHHH, WAIT, PRESS, READY, OKAY, NOTHING |
| "RIGHT": | YES, NOTHING, READY, PRESS, NO, WAIT, WHAT, RIGHT, MIDDLE, LEFT, UHHH, BLANK, OKAY, FIRST |
| "MIDDLE": | BLANK, READY, OKAY, WHAT, NOTHING, PRESS, NO, WAIT, LEFT, MIDDLE, RIGHT, FIRST, UHHH, YES |
| "OKAY": | MIDDLE, NO, FIRST, YES, UHHH, NOTHING, WAIT, OKAY, LEFT, READY, BLANK, PRESS, WHAT, RIGHT |
| "WAIT": | UHHH, NO, BLANK, OKAY, YES, LEFT, FIRST, PRESS, WHAT, WAIT, NOTHING, READY, RIGHT, MIDDLE |
| "PRESS": | RIGHT, MIDDLE, YES, READY, PRESS, OKAY, NOTHING, UHHH, BLANK, LEFT, FIRST, WHAT, NO, WAIT |
| "YOU": | SURE, YOU ARE, YOUR, YOU'RE, NEXT, UH HUH, UR, HOLD, WHAT?, YOU, UH UH, LIKE, DONE, U |
| "YOU ARE": | YOUR, NEXT, LIKE, UH HUH, WHAT?, DONE, UH UH, HOLD, YOU, U, YOU'RE, SURE, UR, YOU ARE |
| "YOUR": | UH UH, YOU ARE, UH HUH, YOUR, NEXT, UR, SURE, U, YOU'RE, YOU, WHAT?, HOLD, LIKE, DONE |
| "YOU'RE": | YOU, YOU'RE, UR, NEXT, UH UH, YOU ARE, U, YOUR, WHAT?, UH HUH, SURE, DONE, LIKE, HOLD |
| "UR": | DONE, U, UR, UH HUH, WHAT?, SURE, YOUR, HOLD, YOU'RE, LIKE, NEXT, UH UH, YOU ARE, YOU |
| "U": | UH HUH, SURE, NEXT, WHAT?, YOU'RE, UR, UH UH, DONE, U, YOU, LIKE, HOLD, YOU ARE, YOUR |
| "UH HUH": | UH HUH, YOUR, YOU ARE, YOU, DONE, HOLD, UH UH, NEXT, SURE, LIKE, YOU'RE, UR, U, WHAT? |
| "UH UH": | UR, U, YOU ARE, YOU'RE, NEXT, UH UH, DONE, YOU, UH HUH, LIKE, YOUR, SURE, HOLD, WHAT? |
| "WHAT?": | YOU, HOLD, YOU'RE, YOUR, U, DONE, UH UH, LIKE, YOU ARE, UH HUH, UR, NEXT, WHAT?, SURE |
| "DONE": | SURE, UH HUH, NEXT, WHAT?, YOUR, UR, YOU'RE, HOLD, LIKE, YOU, U, YOU ARE, UH UH, DONE |
| "NEXT": | WHAT?, UH HUH, UH UH, YOUR, HOLD, SURE, NEXT, LIKE, DONE, YOU ARE, UR, YOU'RE, U, YOU |
| "HOLD": | YOU ARE, U, DONE, UH UH, YOU, UR, SURE, WHAT?, YOU'RE, NEXT, HOLD, UH HUH, YOUR, LIKE |
| "SURE": | YOU ARE, DONE, LIKE, YOU'RE, YOU, HOLD, UH HUH, UR, SURE, U, WHAT?, NEXT, YOUR, UH UH |
| "LIKE": | YOU'RE, NEXT, U, UR, HOLD, DONE, UH UH, WHAT?, UH HUH, YOU, LIKE, SURE, YOU ARE, YOUR |
Keep Talking and Nobody Explodes v. 9
Memory
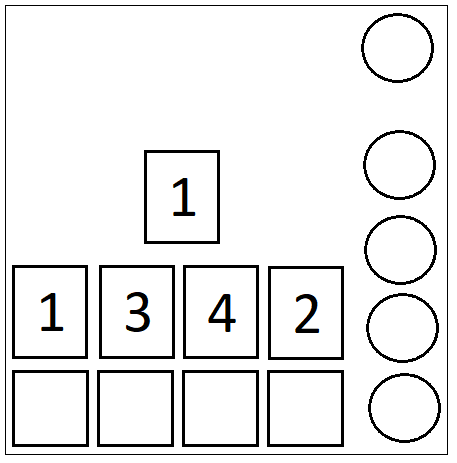
On the Subject of Memory
Memory is a fragile thing but so is everything else when a bomb goes off, so pay attention!
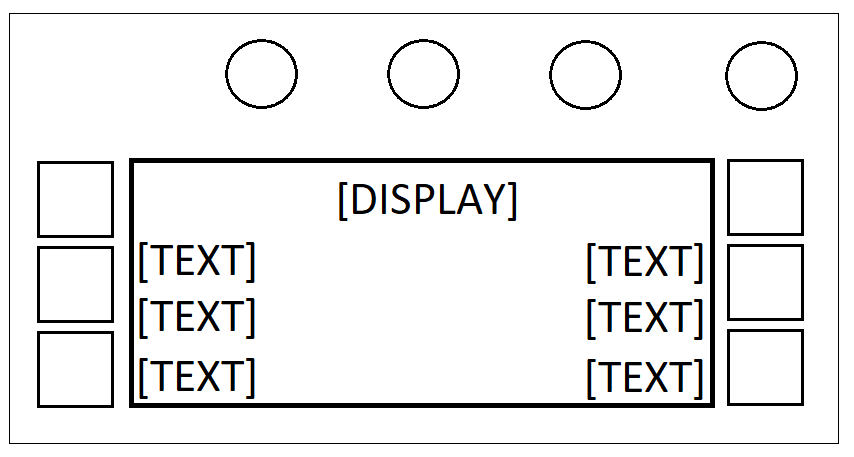
- Press the correct button to progress the module to the next stage. Complete all stages to disarm the module.
- Pressing an incorrect button will reset the module back to stage 1.
- Button positions are ordered from left to right.
Stage 1:
If the display is 1, press the button in the second position.
If the display is 2, press the button in the second position.
If the display is 3, press the button in the third position.
If the display is 4, press the button in the fourth position.
Stage 2:
If the display is 1, press the button labeled "4".
If the display is 2, press the button in the same position as you pressed in stage 1.
If the display is 3, press the button in the first position.
If the display is 4, press the button in the same position as you pressed in stage 1.
Stage 3:
If the display is 1, press the button with the same label you pressed in stage 2.
If the display is 2, press the button with the same label you pressed in stage 1.
If the display is 3, press the button in the third position.
If the display is 4, press the button labeled "4".
Stage 4:
If the display is 1, press the button in the same position as you pressed in stage 1.
If the display is 2, press the button in the first position.
If the display is 3, press the button in the same position as you pressed in stage 2.
If the display is 4, press the button in the same position as you pressed in stage 2.
Stage 5:
If the display is 1, press the button with the same label you pressed in stage 1.
If the display is 2, press the button with the same label you pressed in stage 2.
If the display is 3, press the button with the same label you pressed in stage 4.
If the display is 4, press the button with the same label you pressed in stage 3.